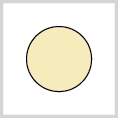
WHITE (w)
1 cHANNEL
Single white LED output. One channel controls intensity from 0 to 255.
tUNABLE wHITE
2 CHANNELS
Two white channels (warm + cool). Adjust colour temperature and intensity independently.
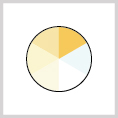
cOLOURfLOW rgbw / rgba
4 CHANNELS
One channel per colour: Red, Green, Blue, White (or Amber). Full colour mixing control.
DMX | Function | Data | Parameters | Description |
CH1 | Set address 001 to 255 | 0 | 0 = no change* | Use this DMX channel to set an address from 001 to |
1…255 | DMX address = 1…255 |
DMX | Function | Data | Parameters | Description |
CH2 | Set address 256 to 508 | 0 | 0 = no change | Use this DMX channel to set an address from 256 to 508. The configured DMX address is called “n” |
1…255 | DMX address = 256…508 |
DMX | Function | Data | Parameters | Description |
CH3 |
Static behaviour | 0 | no change |
If no DMX is present the fixture will respond like set in this function |
1 | Last DMX value* | |||
2 | Output off | |||
3 | Load static values |
DMX | Function | Data | Parameters | Description |
CH4 | Soft dim | 0 | no change | When dynamic softdim is activated an extra DMX channel after the colours and/or master controls the soft dim reaction. If fixed no extra DMX channel is used. |
1 | off* | |||
2 | Dynamic | |||
3-250 | Fixed interpolation delay |
DMX | Function | Data | Parameters | Description |
CH5 |
Master control | 0 | no change | If master is first channel is selected the channel will be DMX channel “n”. If master is last channel is selected the channel will be “n+x” (“x” is calculated in the output patch) |
1 | no master used* | |||
2 | master is first channel | |||
3 | master is last channel |
DMX | Function | Data | Parameters | Description |
CH6 |
Output 1 patch | 0 | no change | Each output channel can be patched to respond to the desired DMX channel. This enables the user to mix up the colours according to the controller that is used. |
1 | DMX channel n | |||
2 | DMX channel n+1 | |||
3 | DMX channel n+2 | |||
4 | DMX channel n+3 |
Example: all outputs are patched as 1
All outputs will be controlled by DMX channel “n”. If master is used total DMX channels will be 2, otherwise it uses 1 channel (“x” = 1).
Example: output 1&2 are patched as 1 and 3&4 are patched as 2
Output 1&2 will be controlled by DMX channel “n”.
Output 3&4 will be controlled by DMX channel “n+1”.
If master is used total DMX channels will be 3 otherwise it uses 2 channels (“x” = 2).
DMX | Function | Data | Parameters | Description |
CH7 |
Output 2 patch | 0 | no change |
Each output channel can be patched to respond to the desired DMX channel. This enables the user to mix up the colours according to the controller that is used. |
1 | DMX channel n | |||
2 | DMX channel n+1 | |||
3 | DMX channel n+2 | |||
4 | DMX channel n+3 |
Example: all outputs are patched as 1
All outputs will be controlled by DMX channel “n”. If master is used total DMX channels will be 2, otherwise it uses 1 channel (“x” = 1).
Example: output 1&2 are patched as 1 and 3&4 are patched as 2
Output 1&2 will be controlled by DMX channel “n”.
Output 3&4 will be controlled by DMX channel “n+1”.
If master is used total DMX channels will be 3 otherwise it uses 2 channels (“x” = 2).
DMX | Function | Data | Parameters | Description |
CH8 |
Output 3 patch | 0 | no change |
Each output channel can be patched to respond to the desired DMX channel. This enables the user to mix up the colours according to the controller that is used. |
1 | DMX channel n | |||
2 | DMX channel n+1 | |||
3 | DMX channel n+2 | |||
4 | DMX channel n+3 |
Example: all outputs are patched as 1
All outputs will be controlled by DMX channel “n”. If master is used total DMX channels will be 2, otherwise it uses 1 channel (“x” = 1).
Example: output 1&2 are patched as 1 and 3&4 are patched as 2
Output 1&2 will be controlled by DMX channel “n”.
Output 3&4 will be controlled by DMX channel “n+1”.
If master is used total DMX channels will be 3 otherwise it uses 2 channels (“x” = 2).
DMX | Function | Data | Parameters | Description |
CH9 |
Output 4 patch | 0 | no change |
Each output channel can be patched to respond to the desired DMX channel. This enables the user to mix up the colours according to the controller that is used. |
1 | DMX channel n | |||
2 | DMX channel n+1 | |||
3 | DMX channel n+2 | |||
4 | DMX channel n+3 |
Example: all outputs are patched as 1
All outputs will be controlled by DMX channel “n”. If master is used total DMX channels will be 2, otherwise it uses 1 channel (“x” = 1).
Example: output 1&2 are patched as 1 and 3&4 are patched as 2
Output 1&2 will be controlled by DMX channel “n”.
Output 3&4 will be controlled by DMX channel “n+1”.
If master is used total DMX channels will be 3 otherwise it uses 2 channels (“x” = 2).
DMX | Function | Data | Parameters | Description |
CH10 |
Static output 1 | 0 | no change | Each output channel can be set to a static intensity. If no DMX is present and static behaviour is set to “load static values”. The outputs will be set to the configured intensity values. |
1
| output off | |||
2…255 | intensity 2…255 *(255) |
DMX | Function | Data | Parameters | Description |
CH11 |
Static output 2 | 0 | no change | Each output channel can be set to a static intensity. If no DMX is present and static behaviour is set to “load static values”. The outputs will be set to the configured intensity values. |
1
| output off | |||
2…255 | intensity 2…255 *(255) |
DMX | Function | Data | Parameters | Description |
CH12 |
Static output 3 | 0 | no change | Each output channel can be set to a static intensity. If no DMX is present and static behaviour is set to “load static values”. The outputs will be set to the configured intensity values. |
1
| output off | |||
2…255 | intensity 2…255 |
DMX | Function | Data | Parameters | Description |
CH13 |
Static output 4 | 0 | no change | Each output channel can be set to a static intensity. If no DMX is present and static behaviour is set to “load static values”. The outputs will be set to the configured intensity values. |
1
| output off | |||
2…255 | intensity 2…255 *(255) |
DMX | Function | Data | Parameters | Description |
CH14 | Load default settings | 0 | no change | This function resets all settings to the Factory |
1 | Load Factory settings |
Factory settings | |||||||||||
Address | Static behaviour | Soft dim | Master control | Output patch 1 | Output patch 2 | Output patch 3 | Output patch 4 | Static output 1 | Static output 2 | Static output 3 | Static output 4 |
1 | 1 | Off | Off | 1 (R) | 2 (G) | 3 (B) | 4 (W) | 255 | 255 | 255 | 255 |
|
DMX |
Function |
Data |
Parameters |
Description |
|
CH15 |
Input Resolution setting |
0 |
no change |
In 16 bit mode 2 channels are used per colour. First channel is rough channel, second channel fine. 16 bit mode is only available in DRIVE mode 2. |
|
1
|
8 bit* |
|||
|
2 |
16 bit |